以下サイトが参考になりそう。
GridSplitterを使う時の注意
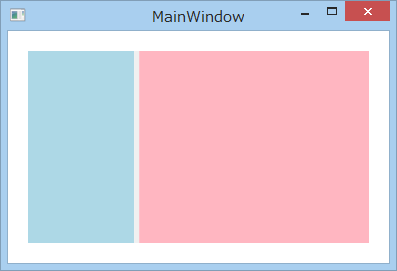
GridSplitter の HorizontalAlignment="Center"を設定してあげないと,挙動が変になる。
正常コード
<Grid Margin="20">
	<Grid.ColumnDefinitions>
		<ColumnDefinition Width="*"/>
		<ColumnDefinition Width="auto"/>
		<ColumnDefinition Width="*"/>
	</Grid.ColumnDefinitions>
	<Grid Grid.Column="0" Background="LightBlue"/>
	<GridSplitter Grid.Column="1" Width="5" HorizontalAlignment="Center"/>
	<Grid Grid.Column="2" Background="LightPink"/>
</Grid>

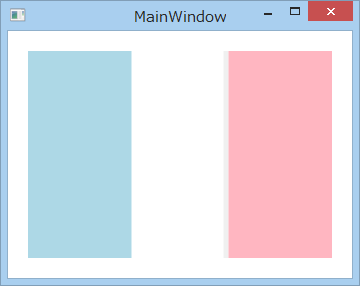
変なコード
真ん中が割れちゃう。
<Grid Margin="20">
	<Grid.ColumnDefinitions>
		<ColumnDefinition Width="*"/>
		<ColumnDefinition Width="auto"/>
		<ColumnDefinition Width="*"/>
	</Grid.ColumnDefinitions>
	<Grid Grid.Column="0" Background="LightBlue"/>
	<GridSplitter Grid.Column="1" Width="5"/>
	<Grid Grid.Column="2" Background="LightPink"/>
</Grid>

ThumbコントロールのMouseDownイベントを発生させる
確かに,Thumbコントロールの MouseDown は,
イベントは起きないというか,
正確には,論理ツリーをbuble upして伝播していくんですが,
その時にハンドラメソッドが呼ばれないように,
Thumbコントロールが実装時にUIElement.MouseDownを
クラスハンドリング(class handling)して,handled = true してしまっていますね。
(handled == true だと,イベントが伝播してきても,
ふつうのやり方で登録されたハンドラメソッドは呼び出されない)
例えば,そのクラスハンドリング処理からの抜け道を作るため
public Window1()
{
InitializeComponent();
AddHandler(System.Windows.Controls.Primitives.Thumb.MouseDownEvent, new RoutedEventHandler(MyMouseDown), true);
}
void MyMouseDown(object sender, RoutedEventArgs e)
{
MessageBox.Show(string.Format("MyMouseDown: handled == {0}", e.Handled));
}
のように AddHandler してやる
と,
"MyMouseDown: handled == true"
となるので,クラスハンドリング(class handling)していることを確認できます。
なので,bublingイベントが発生してしなかったのですね。
回避方法は,Preview系(tunneling系)イベントを使うか,AddHandler(..., ..., true) を使うか
が,ヘルプによると,推薦のようですね。
# 私もかなり勉強になりました。
# 他のコントロールでもクラスハンドリングしているイベントが多々あると思うので,
# きっと,みんなこれがわからずに,嵌りますね...
ListView/ListBoxの要素間の隙間を無くす
ItemContainerStyleでListBoxItemのスタイルのPaddingを0にすればよい。
<ItemsControl.ItemContainerStyle>
	<Style TargetType="{x:Type ListBoxItem}">
		<Setter Property="BorderThickness" Value="1"/>
		<Setter Property="Margin" Value="0"/>
		<Setter Property="Padding" Value="0"/>
	</Style>
</ItemsControl.ItemContainerStyle>
コレクション型依存関係プロパティ
なんかうまく動かないんだよなぁ。。
調査中。
まとまったら文章整理する。
コレクション型依存関係プロパティ | Microsoft Docs
INotifyPropertyChangedの実装
いつも調べちゃうのでメモ。
INotifyPropertyChangedを継承する
プロパティの変更通知をViewに反映するので,ViewModelに継承させることが多い。
場合によってはModelに継承させることもしばしば。
NugetからPrismパッケージをインストールして使用すると,次の見出しで説明するSetPropertyが標準で実装されているが,Nugetからインストールするのがめんどくさい。
実装する
OnProperty(string propertyName)の実装が基本だが,以下のようにSetPropertyメソッドを実装するほうが使い勝手がいい。
#region INotifyPropertyChanged Support
public event PropertyChangedEventHandler PropertyChanged;
protected void OnPropertyChanged(string propertyName)
{
	PropertyChanged?.Invoke(this, new PropertyChangedEventArgs(propertyName));
}

protected virtual bool SetProperty<T>(ref T field, T value, [CallerMemberName]string propertyName = null)
{
	if (Equals(field, value)) { return false; }
	field = value;
	this.PropertyChanged?.Invoke(this, new PropertyChangedEventArgs(propertyName));
	return true;
}
#endregion INotifyPropertyChanged Support
使いかた
プロパティのsetterを以下のように記入して使う。
OnPropertyChangedの場合
OnPropertyChangedを呼び出して,Viewに変更通知を行う。
private string _displayText;
public string DisplayText { get => _displayText; set { _displayText = value; OnPropertyChanged(nameof(DisplayText)); } }
SetPropertyの場合
SetPropertyを呼び出せば,プロパティの値変更と変更通知を同時にしてくれる。
private string _displayText;
public string DisplayText { get => _displayText; set => SetProperty(ref _displayText, value); }
コードビハインドのデータをBindingする
方法
コードビハインドに書いたプロパティをBindingさせるには,
RelativeSourceでUserControlやWindow等大元まで参照を戻す必要がある。
これしないとDataContextを参照しようとするからね。
XAML:
<TextBlock Text="{Binding RelativeSource={RelativeSource AncestorType={x:Type UserControl}}, Path=SampleText}"/>
コードビハインド:
public string SampleText { get; set; }